组态界面介绍
💡提示
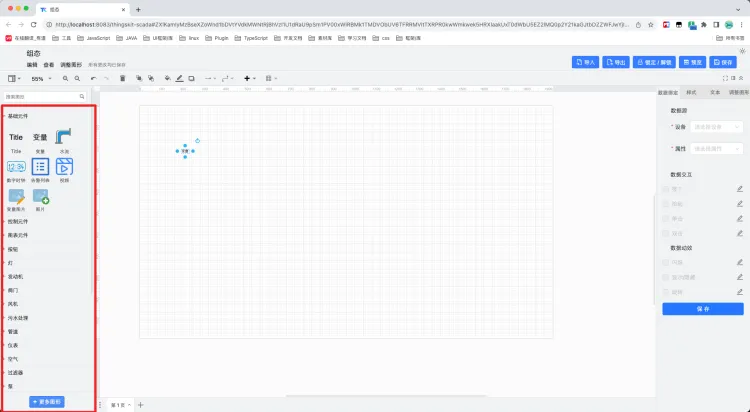
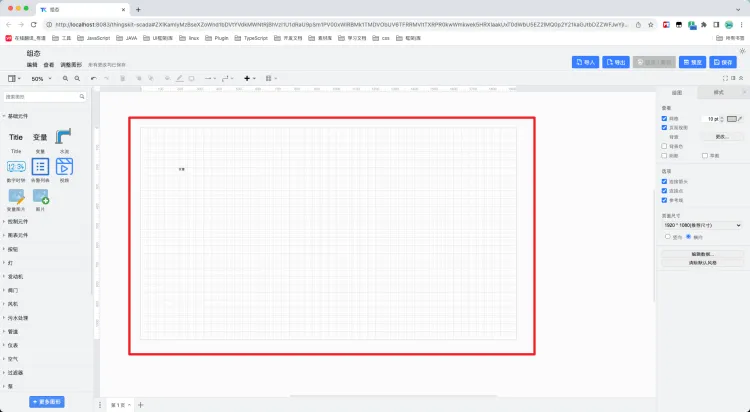
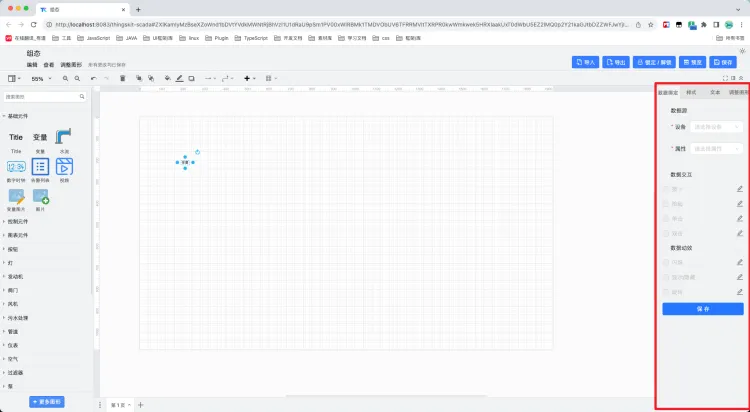
组态开发的内容包括下面界面中的元件库开发、画布中的节点开发以及元件的数据绑定面板开发。
元件库面板
画布
元件数据绑定面板
开发步骤
1/3: 元件库面板开发
一、进入项目根目录下的public/webapp/js/diagramly/sidebar/thingskit目录
二、创建Sidebar-ExampleComponent.js文件
(function () {
  Sidebar.prototype.addThingsKitExampleComponentsPalette = function () {
    this.addExampleComponentsPalette()
  }

  const { COMPONENT_KEY, CATEGORY } = window.CellAttributeKeyEnum

  // 组件key 不能重复
  const dt = 'exampleComponents'

  Sidebar.prototype.addExampleComponentsPalette = function () {

    function createUserObject(attribute) {
      attribute = Object.assign({ [COMPONENT_KEY]: '', [CATEGORY]: '' }, attribute || {})
      var xmlElement = mxUtils.createXmlDocument().createElement('UserObject');

      Object.keys(attribute).forEach(key => {
        xmlElement.setAttribute(key, attribute[key]);
      })
      return xmlElement
    }

    this.setCurrentSearchEntryLibrary(dt);

    this.addPaletteFunctions(
      // 面板key
      dt,
      // 组件类别面板名称
      '示例组件',
      // 是否默认展开
      true,
      [
        // Example 示例组件
        this.createVertexTemplateEntry(
          // 初始化样式
          "text;html=1;strokeColor=none;fillColor=none;align=center;verticalAlign=middle;whiteSpace=wrap;rounded=0;fontSize=16;",
          // 初始化宽度
          100,
          // 初始化高度
          40,
          // 初始化内容
          createUserObject({ label: 'Example', [COMPONENT_KEY]: 'ExampleComponent', [CATEGORY]: 'Example' }),
          // 标题,设置值为组件库面板中的显示标题
          "Example Component",
          // 是否显示label
          null,
          // 是否显示标题
          !0,
          // 标签tags
          "Example example"
        ),
      ]
    );

    this.setCurrentSearchEntryLibrary();
  };

})();
💡提示
- dt 为元件库的key 不能重复。
- 设置初始化内容时通过 createUserObject 方法创建初始化内容时需要设置label(组件渲染内容)、COMPONENT_KEY(组件key)、CATEGORY(组件类别key)三个属性。
三、进入public/webapp/js/diagramly/Devel.js文件
// 示例组件
mxscript(drawDevUrl + 'js/diagramly/sidebar/thingskit/Sidebar-ExampleComponent.js');
💡提示
在文件的最后引入Sidebar-ExampleComponent.js文件
四、进入public/webapp/js/diagramly/sidebar/Sidebar.js文件。
// 将面板key设置到默认入口中
Sidebar.prototype.defaultEntries = 'exampleComponents;basicComponents;...'

// 增加新增的面板配置
Sidebar.prototype.configuration = [
  { id: 'exampleComponents' },
  // ... other code
]

// 调用增加的组件面板
Sidebar.prototype.initPalettes = function () {
  // ... other code
  // 示例组件
	this.addThingsKitExampleComponentsPalette();
  // 基础元件
	this.addThingsKitBasicComponentsPalette();
  // ... other code
}
💡提示
- 找到 Sidebar.prototype.initPalettes 方法,在此方法的中调用addThingsKitExampleComponentsPalette 方法。
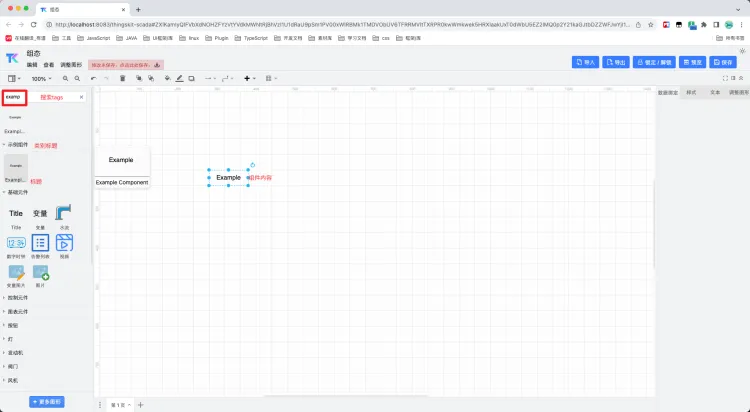
五、新增成功后效果图
2/3:组件内容
一、使用原始逻辑绘制内容
(function () {
  Sidebar.prototype.addThingsKitExampleComponentsPalette = function () {
    this.addExampleComponentsPalette()
  }

  const { COMPONENT_KEY, CATEGORY } = window.CellAttributeKeyEnum

  // 组件key 不能重复
  const dt = 'exampleComponents'

  Sidebar.prototype.addExampleComponentsPalette = function () {

    function createUserObject(attribute) {
      attribute = Object.assign({ [COMPONENT_KEY]: '', [CATEGORY]: '' }, attribute || {})
      var xmlElement = mxUtils.createXmlDocument().createElement('UserObject');

      Object.keys(attribute).forEach(key => {
        xmlElement.setAttribute(key, attribute[key]);
      })
      return xmlElement
    }

    this.setCurrentSearchEntryLibrary(dt);

    this.addPaletteFunctions(
      // 面板key
      dt,
      // 组件类别面板名称
      '示例组件',
      // 是否默认展开
      true,
      [
        // Example 示例组件
        this.createVertexTemplateEntry(
          // 初始化样式 html=1使用html语法进行渲染
          "text;html=1;strokeColor=none;fillColor=none;align=center;verticalAlign=middle;whiteSpace=wrap;rounded=0;fontSize=16;",
          // 初始化宽度
          200,
          // 初始化高度
          80,
          // 设置渲染内容
          createUserObject({
            label: `
        <table border="1" style="border-collapse: collapse;">
          <tr style="background-color: #a7c942; color: #fff;">
            <th>Title 1</th>
            <th>Title 2</th>
            <th>Title 3</th>
          </tr>
          <tr>
            <td>Value 1</td>
            <td>Value 2</td>
            <td>Value 3</td>
          </tr>
        </table>`.replace(/\n/g, ''), [COMPONENT_KEY]: 'ExampleComponent', [CATEGORY]: 'Example'
          }),
          // 标题,设置值为组件库面板中的显示标题
          "Example Component",
          // 是否显示label
          true,
          // 是否显示标题
          !0,
          // 标签tags
          "Example example"
        ),
      ]
    );

    this.setCurrentSearchEntryLibrary();
  };

})();
💡提示
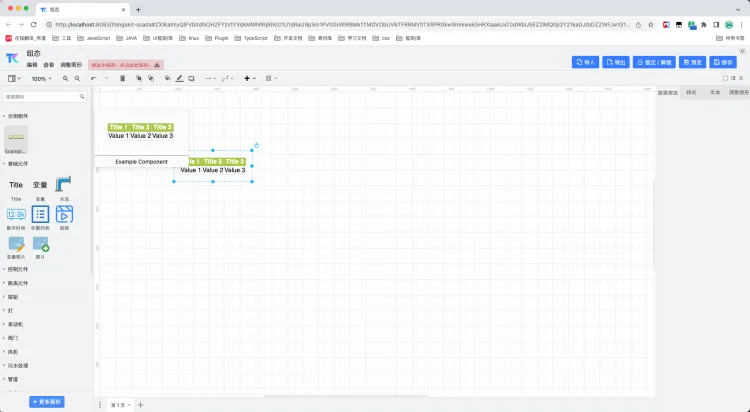
改变 createUserObject 中的label属性,使用html语法绘制组件内容。
效果图
二、使用vue绘制组件内容
(一) 修改Sidebar-ExampleComponent.js文件
(function () {
  Sidebar.prototype.addThingsKitExampleComponentsPalette = function () {
    this.addExampleComponentsPalette()
  }

  const { COMPONENT_KEY, CATEGORY } = window.CellAttributeKeyEnum

  // 组件key 不能重复
  const dt = 'exampleComponents'

  Sidebar.prototype.addExampleComponentsPalette = function () {

    function createUserObject(attribute) {
      attribute = Object.assign({ [COMPONENT_KEY]: '', [CATEGORY]: '' }, attribute || {})
      var xmlElement = mxUtils.createXmlDocument().createElement('UserObject');

      Object.keys(attribute).forEach(key => {
        xmlElement.setAttribute(key, attribute[key]);
      })
      return xmlElement
    }

    this.setCurrentSearchEntryLibrary(dt);

    this.addPaletteFunctions(
      // 面板key
      dt,
      // 组件类别面板名称
      '示例组件',
      // 是否默认展开
      true,
      [
        // Example 示例组件
        this.createVertexTemplateEntry(
          // 初始化样式 设置图形处理逻辑
          "shape=mxgraph.thingskit/exampleComponent;text;html=1;strokeColor=none;fillColor=none;align=center;verticalAlign=middle;whiteSpace=wrap;rounded=0;fontSize=16;",
          // 初始化宽度
          200,
          // 初始化高度
          80,
          // 初始化内容
          createUserObject({ label: ``, [COMPONENT_KEY]: 'ExampleComponent', [CATEGORY]: 'Example' }),
          // 标题,设置值为组件库面板中的显示标题
          "Example Component",
          // 是否显示label
          true,
          // 是否显示标题
          !0,
          // 标签tags
          "Example example"
        ),
      ]
    );

    this.setCurrentSearchEntryLibrary();
  };

})();
💡提示
- 设置样式,追加 shape=mxgraph.thingskit/exampleComponents 属性。
- 设置 createUserObject 中的 label 属性为空,不为空时将出现内容重叠的现象。
(二) 创建 mxExampleComponent.js 文件
// 创建目录
// public/webapp/shapes/thingskit/mxExampleComponent.js
function mxExampleComponent(bounds, fill, stroke, strokewidth) {
  mxShape.call(this);
  this.bounds = bounds;
  this.fill = fill;
  this.stroke = stroke;
  this.strokewidth = (strokewidth != null) ? strokewidth : 1;
}

mxUtils.extend(mxExampleComponent, mxShape)

mxExampleComponent.prototype.customProperties = [

]

// 与Sidebar-ExampleComponent.js中的style设置的key相同
mxExampleComponent.prototype.shapeKey = 'mxgraph.thingskit/exampleComponent'

mxExampleComponent.prototype.paintVertexShape = function (c, x, y, w, h) {
  this.paintBackground(c, x, y, w, h)
  this.foreground(c, x, y, w, h)
}

mxExampleComponent.prototype.paintBackground = function (svgCanvas, x, y, w, h) {
  svgCanvas.rect(x, y, w, h);
  svgCanvas.fillAndStroke()
}

mxExampleComponent.prototype.foreground = function (svgCanvas, x, y, w, h) {
  var cell = this.state.cell

  // status值为tooltip edit tooltip
  var status = getCellStatus(this.state.view.graph)
  if (status === 'sidebar') {
    // 设置图片
    svgCanvas.image(...this.getThumbSize(x, y, w, h), IMAGE_PATH + '/thingskit/xxx.svg')
  } else {
    createComponent(this, svgCanvas, x, y, w, h)
    setContainerSize(this, svgCanvas, x, y, w, h)
  }
}

mxExampleComponent.prototype.configureCanvas = function (a, b, c, d) {
  mxShape.prototype.configureCanvas.apply(this, arguments)
  a.setFontColor(this.color);
  a.setFontFamily(this.family);
  a.setFontSize(this.size);
  a.setFontStyle(this.fontStyle)
}

mxExampleComponent.prototype.updateMargin = function () {
  this.margin = mxUtils.getAlignmentAsPoint(this.align, this.valign)
}

mxExampleComponent.prototype.apply = function (a) {
  mxText.prototype.apply.apply(this, arguments);
  this.opacity = mxUtils.getValue(this.style, mxConstants.STYLE_OPACITY, 100)
}

mxExampleComponent.prototype.getThumbSize = function (x, y, w, h) {
  const offset = Math.min(x, y)
  const size = Math.max(w, h)
  return [offset, offset, size, size]
}

mxCellRenderer.registerShape(mxExampleComponent.prototype.shapeKey, mxExampleComponent)
💡提示
- 创建 mxExampleComponent.js 进行重写渲染逻辑。
(三) 在mxStencilRegistry.libraries中注册组件
// public/webapp/js/diagramly/Editor.js

// ... other code
// 图片组件
mxStencilRegistry.libraries['thingskit/imageComponent'] = [SHAPES_PATH + '/thingskit/mxImageComponent.js']
// 示例组件
mxStencilRegistry.libraries['thingskit/exampleComponent'] = [SHAPES_PATH + '/thingskit/mxExampleComponent.js']
💡提示
- 需要在 Editor.js 中注册 mxExampleComponent.js。
- libraries 的key值需要一致。
(四) 创建vue组件
- 进入 src/core/Library/packages 目录。
- 创建 Example 类别目录。
- 创建 ExampleComponent 目录。
- 在 ExampleComponent 目录下创建 config.ts 、config.vue 、 index.ts 、index.vue 四个文件。
1. 目录结构图
packages
└── Example
    └── ExampleComponent
        ├── config.ts
        ├── config.vue
        ├── index.ts
        └── index.vue
2. config.ts
import { cloneDeep } from 'lodash-es'
import { ExampleComponentConfig } from '.'
import { ModeEnum } from '@/enums/modeEnum'
import type { ConfigPresetOptionsType, CreateComponentParamsType, CreateComponentType } from '@/core/Library/types'

export const options: ConfigPresetOptionsType = {

}

export default class Config implements CreateComponentType {
  public key: string = ExampleComponentConfig.key

  public presetOption = cloneDeep(options)

  public mode = ModeEnum.EDIT

  public category = ExampleComponentConfig.category

  constructor(params: CreateComponentParamsType = {} as CreateComponentParamsType) {
    type Keys = keyof CreateComponentParamsType
    const keys = Object.keys(params) as Keys[]

    for (const key of keys)
      ((this as CreateComponentParamsType)[key] as CreateComponentParamsType[typeof key]) = params[key]
  }
}
3. config.vue
<script setup lang="ts">
import type { ConfigComponentProps } from '@/core/Library/types'
const props = defineProps<ConfigComponentProps>()
</script>

<template>
  <main>
    示例组件数据绑定面板
  </main>
</template>
4. index.ts
import { PackageCategoryEnum, PackageCategoryNameEnum } from '@/core/Library/enum'
import { useComponentKeys } from '@/core/Library/hook/useComponentKeys'
import type { ConfigType } from '@/core/Library/types'

const componentKeys = useComponentKeys('ExampleComponent')
export const ExampleComponentConfig: ConfigType = {
  ...componentKeys,
  category: PackageCategoryEnum.EXAMPLE,
  categoryName: PackageCategoryNameEnum.EXAMPLE,
}
5. index.vue
<script setup lang="ts">
import type { RenderComponentProps } from '@/core/Library/types'

const props = defineProps<RenderComponentProps>()
</script>

<template>
  <main>
    示例组件内容
  </main>
</template>
💡提示
- config.ts 配置组件信息,配置信息可以在 数据绑定面板组件 config.vue 与渲染组件 index.vue 中的props中获取。
- index.ts 声明组件基本信息。
- index.vue 内容渲染组件。
- config.vue 数据绑定面板组件。
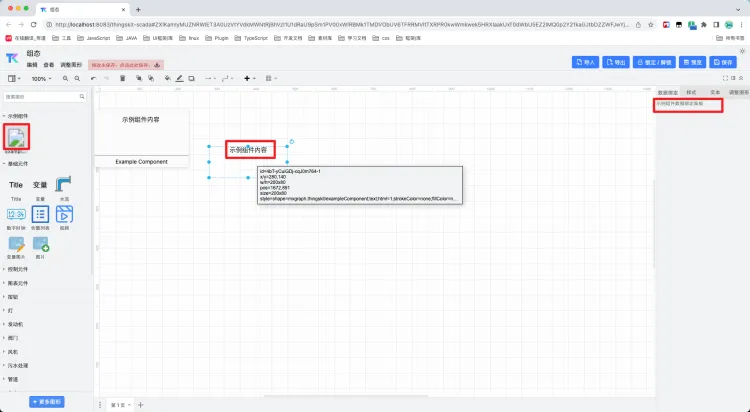
- 创建的目录名与文件名需要与 Sidebar-ExampleComponent.js 中 createUserObject 的 CATEGORY 组件类别属性与 COMPONENT_KEY 组件key属性值保持一致。
6. 效果图
3/3: Websocket数据绑定
文件说明
processor socket处理器
// src/core/websocket/processor/index.ts

export class LightboxModeWebsocketService extends TelemetryWebsockerService {
  dataSource: NodeDataType[] // 数据源

  nodeUtils: NodeUtils // 节点工具

  messageHandler: MessageHandler // 消息处理者

  eventHandler: EventHandler // 事件处理者

  constructor(public App: DrawApp) {

  }

  getNodeDataSubscribers(nodeData: NodeDataType) {
    // 处理单个节点绑定的数据源
    // 将数据源转换为消息订阅者
  }


  processOnMessage(message: WebsocketDataMsg): void {
    // socket 接收消息分发消息
  }

  unsubscribeCurrentPageData() {
    // 取消订阅
  }

  onSelectPageChange() {
    // 切换分页处理
  }
}
💡提示
getNodeDataSubscribers 在此方法中将数据源转换为消息订阅者。
eventHandler 事件处理器
// src/core/websocket/processor/eventHandler.ts
export class EventHandler {
  addDbClickEventListener() {
  	// 添加双击事件
  }

  addClickEventListener() {
  	// 添加单击事件
  }

  addMouseUpOrDownEventListener() {
  	// 添加鼠标按下与抬起事件
  }

  dispathEvent(eventName: EventTypeEnum, event: MxEvent) {
  	//	分发事件
  }
}
messageHandler 消息处理器
// src/core/websocket/processor/messageHandler.ts
export class MessageHandler {
	// 分发消息
  distribute(message: SubscriptionUpdateMsg) {

  }
	// 更新数据源
  updateDataSource(commandSource: CommandSource, message: SubscriptionUpdateMsg) {

  }

	// 默认处理数据源
  defaultHandler(commandSource: CommandSource, message: SubscriptionUpdateMsg) {

  }

  // 更新数据动效
  updateDataDynamicEffect(commandSource: CommandSource, message: SubscriptionUpdateMsg) {

  }
}
💡提示
updateDataSource 方法中将调用需要更新的节点组件的更新方法( onMessage ) 方法,若组件没有 onMessage 更新方法,将调用 defaultHandler 方法进行默认处理。
dataDynamicEffectHandler 数据动效处理器
💡提示
在 DataDynamicEffectHandler 中声明不同的数据动效处理逻辑,将在消息处理器 messageHandler 的 updateDataDynamicEffect 方法进行分发处理。
组件订阅消息
<script setup lang="ts">
  import { useOnMessage } from '@/core/Library/hook/useOnMessage'
  import type { RenderComponentExposeType, RenderComponentProps } from '@/core/Library/types'

  const props = defineProps<RenderComponentProps>()

    const { onMessage } = useOnMessage({
      onReceiveActMessage(commandSource, message) {
        // 关于数据动效的消息
      },
      onReceiveDataSourceMessage(commandSource, message) {
        // 关于数据源中的消息
      },
      onReceiveEventMessage(commandSource, message) {
        // 关于事件中的消息
      },
    })

  defineExpose<RenderComponentExposeType>({
    onMessage,
  })
</script>

<template>
  <main>
    示例组件内容
  </main>
</template>
💡提示
- 在渲染组件中定义抛出 onMessage 方法。
- onReceiveDataSourceMessage 定义关于接收到数据源的socket消息。
- onReceiveEventMessage 定义关于接收到事件的socket消息。
- onReceiveActMessage 定义关于接收到数据动效的socket消息。
- 如果组件未定义抛出 onMessage 消息将按照默认的处理逻辑更新视图。
参考文档
https://www.drawio.com/doc/faq
https://juejin.cn/post/7065578041140838436
https://juejin.cn/post/7017686432009420808#heading-8


